
Firewall in OVH

Firewall for Dedicated Servers in OVH Cloud
Overview of default firewall setup in OVH
This is a guide on how to setup a Linux based firewall in OVH to protect your physical servers. By default OVH Dedicated Servers (Physical Servers) are only protected by Windows firewall and the OVH perimeter firewall. As of 2024 there is no option for either hardware firewalls or Linux based firewalls.
The OVH firewall allows you to protect your physical server by adding up to 20 firewall rules. However, this is a perimeter firewall for all servers within OVH. So anyone who takes control of a machine in OVH or simply pays £5 per month for a VPS is on the inside of this firewall and will bypass it.
This leaves the Windows firewall to protect your physical server. This is not ideal and with the issue of some software creating firewall rules when it’s being installed makes things worse.
What we are trying to achieve
This is a guide that sets up a Linux based firewall on a dedicated server. This is done by disabling the Public facing network cards on the physical servers which you want to protect. All traffic to your other physical servers both incoming and outgoing is routed via the firewall
Linux based firewall in this instance is Netgate pfSense, although what are termed Cloud Based firewalls from other commercial vendors such as Fortigate and Cisco could potentially be used.
Preparation
There is no option to install from an ISO image file to a dedicated server for this. You need to make a pre-prepared image of a VM running pfSense and use this.
Why do we need to this? It simply takes the image that you present to it and copies it to the hard disks in the server. Therefore if you use the standard pfSense.iso that you would normally install with, it writes this to the hard disk. The first time you start the server it goes into the pfSense installation, then upon reboot it goes back into the pfSense installation again. This becomes a never ending loop.
To prepare the image we use a machine running Hyper-V and simply installed pfSense as per normal. But don’t do any configuration of network cards etc at this point as it’s not required.
You can do this a Generation 2 VM, but make sure that you turn off the Secure Boot or else it won’t start.
Once it’s created, there is a requirement to convert the .VHDX file to RAW format. This can be done by using a program called QEMU – https://www.qemu.org/
This is a command line tool that converts disks into different formats.
In the following command we have copied the .VHDX file into D:\Temp and this command converts the file to QCOW2 format.
qemu-img.exe convert -f vhdx -O qcow2 d:\temp\pfSense.vhdx d:\temp\pfSense.qcow2
Copy
Installation of pfSense in OVH
The above pfSense.qcow2 image is used to do the installation with. Although this isn’t complicated it’s not as smooth as you would like. You need to put the file on to an HTTPS web site and then reference the web site URL and file name in the installer.
When you go into the installation, select Custom from the drop down list and then BYOLINUX
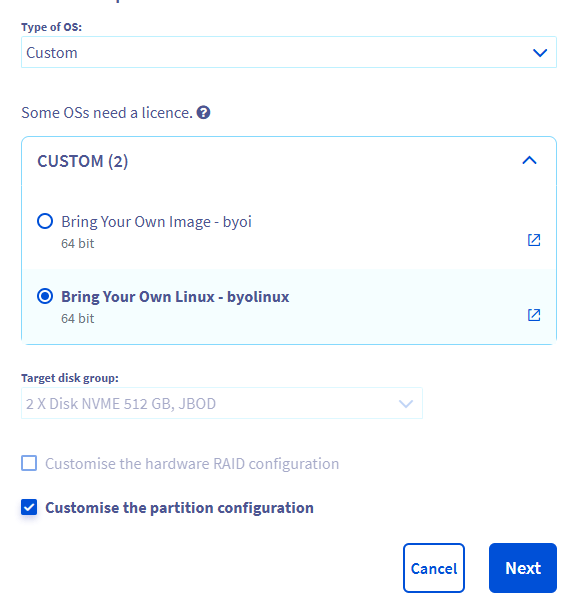
You can use either of the above two options.
In the setup screen enter the URL to the disk image in the URL field.
Initial setup will need to be carried out in the IPMI remote control screen in OVH.
If you are struggling to see the bottom of the screen where the command line is, from the Options Menu > Zoom > Actual Size
In pfSense setup ixl0 is WAN and ixl1 is LAN (they are L’s not 1’s)
Then assign an interface for LAN that is on the same subnet as the Internal network of your physical servers.
Now add the physical server to the VRACK in which the existing physical servers exist.
Optionally reboot pfSense.
Once pfSense has been installed it will let you connect to it over the internet. So good idea to be ready to connect as soon as the install is complete. Once you go through the initial setup, the default settings only allow you to connect to the web configurator from a LAN address from a physical server which is on the same VRACK.
Create alias for the IP’s that you are going to be using RDP to connect to the back end physical servers with. Optionally create aliases for the physical servers you are connecting to.
Create NAT rule that allows the alias you have just created. Each RDP connection will need its own incoming WAN port that is then mapped to the internal IP and port of the physical server you want to connect to.
On the physical server that you need to RDP to make sure the Internal network card has the pfSense LAN IP as it’s gateway address. Otherwise, nothing will connect out and incoming RDP connections will not work.
Test RDP connection via the firewall. Once working you can then disable the External network card on the physical servers.
Considerations for VM’s with Public IP’s
If you are running VM’s on your physical servers it’s likely at least one of them will have a public facing IP.
What OVH term “Floating IP’s” or “Additional IPs’ are Public IP addresses that are purchased individually and then you create a virtual mac address for them etc. These type of IP’s use the External network card on the physical server. So disabling it will also disable internet connectivity for the VM it’s assigned to.
The solution to this issue is to use “IP Blocks”. These come in blocks of 5 but in this instance a block of /30 will give you one working IP.
The IP block uses the Internal network card and for it to work will need adding to the VRACK that the physical servers are in.
If the IP block is for example 11.11.11.10 then the working IP would be 11.11.11.11 and the gateway would be 11.11.11.12. The subnet mask being 255.255.255.252
Simply put these details into the WAN configuration in pfSense.